REVIEW · TULUM
Tulum Mayan Ruins GPS Self-Guided Walking Audio Tour
Book on Viator →Operated by Walk with Action · Bookable on Viator
Tulum ruins, guided by your phone. This low-cost GPS self-guided walking audio tour lets you explore at your pace, with stories that play as you move through key parts of the site. It’s designed for easy wandering, including a suggested route plus map, images, and text, all in English.
I like two things most. First, the tour is hands-free: audio can play automatically based on where your phone thinks you are. Second, you get new, lifetime access with no expiry, so you can reuse the same download on future trips without paying again.
The main thing to consider is that the app depends on your phone’s location. If your location permission is off, or you aren’t standing in the right spot for a trigger, some sections may not play unless you select them manually from the list.
In This Review
- Key highlights you’ll feel right away
- What this GPS audio tour gets right in Tulum
- Getting set up: download on Wi‑Fi, then go offline
- Where you start (and why it matters)
- Walking the route: about 1.5 miles, 1–2 hours
- Stop 1: Ruinas de Tulum start near the parking lot
- Stop 2: Casa Cenote
- Stop 3: Plataforma Funeraria
- Stop 4: El Castillo (Kukulkan connection and elevation)
- Stop 5: Temple of the Frescoes
- Stop 6: Temple of the Wind (storms warning and round platforms)
- Stop 7: Casa del Chultún (rainwater harvesting)
- Stop 8: Templo del Dios del Viento (whistling holes)
- Stop 9: Great Platform and Casa del Noreste
- Stop 10: Templo Maya (Tulum Playa) and the Descending God
- What support and troubleshooting look like in real life
- Price and value: $9.99 that compares well to a guided day
- Heat, timing, and how to make the audio tour feel effortless
- Should you book this Tulum Mayan Ruins GPS walking audio tour?
- FAQ
- Does this tour include admission tickets or entry fees?
- How long is the Tulum audio walk?
- Will it work offline without cellular or Wi‑Fi?
- How does the audio know when to play?
- Where do I start, and does it end back at the same place?
- What devices are recommended to run the GPS navigation?
Key highlights you’ll feel right away

- GPS-based audio that can start stories on its own as you walk
- Offline maps and offline audio, so you can keep going even with no signal
- Lifetime access with no expiry, which makes the $9.99 price feel more generous
- A route with 28+ audio stories across about 1.5 miles
- English narration, plus extra story depth if you want it
- No guide waiting at the start, which is great if you like flexibility (and annoying if you want hand-holding)
What this GPS audio tour gets right in Tulum

Tulum can be hot, busy, and visually overwhelming. This tour is built for that reality by keeping your experience simple: walk the route, let the audio guide you, and pause whenever you want for photos, shade, or a drink.
The tour is also priced to match its format. At $9.99 per person with lifetime access, you’re paying for a self-guided learning tool, not an included guide or entry ticket. For independent travelers, that’s usually the sweet spot.
And the story selection is the core reason people feel good about it. You don’t just get one stop and a few facts. You get more than 28 audio stories spread across meaningful structures, with both narration and supporting info like images and text.
Other Tulum Ruins tours we've reviewed


Getting set up: download on Wi‑Fi, then go offline
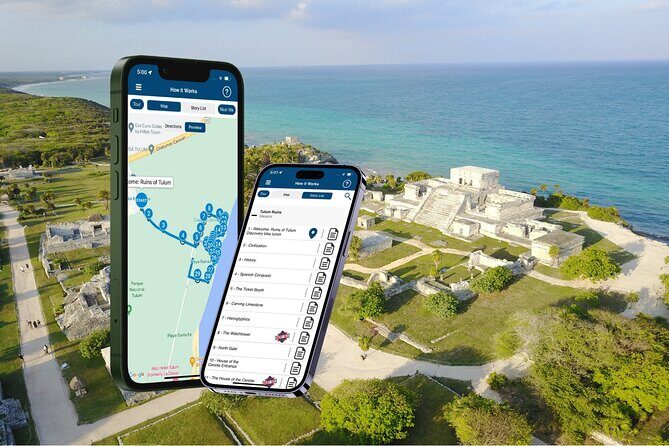
Before you walk, you need one important habit: download the tour while you have strong Wi‑Fi or cellular. The app is meant to work offline after that download, but the initial download step matters.
Here’s the practical approach I recommend based on how the system works. Start in good signal, download the tour, and then switch your phone to a lower-power routine once you’re ready to walk. A power bank is smart too, because the day is long and you’ll keep your screen/phone features active for GPS.
You’ll receive an email and text with setup instructions and a password. Then you open Action’s Tour Guide App on-site, enter the password, and start the correct tour version for your planned starting point and direction.
Also, bring headphones or earbuds. The experience is built for listening while walking, and having audio through speakers is a fast way to make your day less pleasant for everyone around you.
Where you start (and why it matters)
The meeting point is at Ruinas de Tulum, Zona Hotelera Tulum (77765 Q.R., Mexico), and the tour ends back at the same place. No one meets you at the start, so you’ll take ownership right away.
Your first cue is simple: go to the starting story’s point, and the audio is supposed to begin automatically. After that, follow the prompts and stay near the route lines at a walking pace that makes GPS triggers more likely to work.
If you’re the kind of traveler who likes to wander off by 30 feet, this tour may still work, but you’ll need to be ready to tap a story from the list if the automatic playback doesn’t kick in.
Walking the route: about 1.5 miles, 1–2 hours
The tour is described as about 1 hour, but it’s also clearly longer than that in real walking time. Expect over 1.5 miles and plan for roughly 1–2 hours depending on breaks and photo stops.
That range is honestly helpful. In Tulum, you won’t just walk. You’ll stop for views, shade, and curiosity. If you’re traveling in the middle of the day, plan extra time so the tour doesn’t feel like a sprint.
One practical tip: couples can share one tour by splitting headphones. That can cut your cost on a tight budget, but only if you’re both comfortable listening to the same audio in the same way.
Stop 1: Ruinas de Tulum start near the parking lot

Your tour kicks off right next to the parking lot, where the path to the ruins begins. The point here is psychological: you’re not “starting your hike” in a maze. You’re walking a clear path into the site and beginning with context.
You’ll get the introduction story right at the start, and after that the tour keeps you moving from stop to stop. Admission tickets aren’t included, so be sure you handle entry separately.
This opening section is great for two types of travelers. If you want a low-effort start, it gets you oriented fast. If you’re just tired from travel, it keeps your brain busy with stories so you don’t have to read every sign.
Other walking tours we've reviewed in Tulum


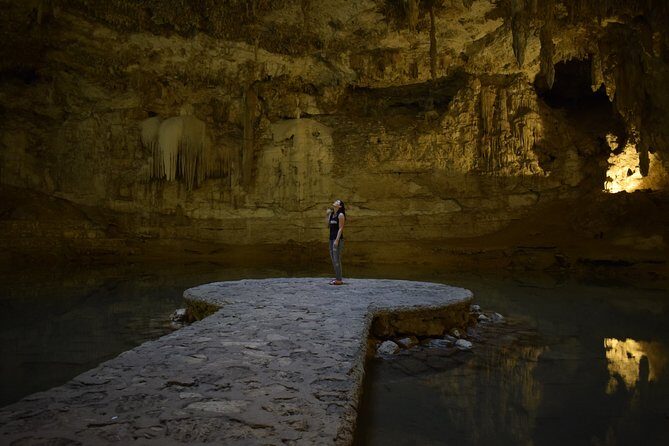
Stop 2: Casa Cenote

The first major landmark you hit is Casa Cenote. The story focus here is atmospheric: you step through an entrance and the tour frames it like a change in world, not just another room.
From a pacing point of view, this is a smart early stop. You get a quick sense that the site is not random. It’s a connected set of spaces, each tied to how people lived and used the area.
As with all GPS-triggered tours, the key is to stay close to where the audio expects you to be. If the story doesn’t start when you think it should, don’t panic. Use your phone to select the next story manually.
Stop 3: Plataforma Funeraria

Next comes Plataforma Funeraria, and the narration ties the structure to funeral rites. The tour includes a specific detail: before a body was buried or cremated, the Mayans placed maize in the mouth.
That’s the kind of detail that makes an audio tour feel worth it. It gives you a reason to look longer at the structure rather than just passing through.
It also affects your walking rhythm. You’ll likely slow down here because it’s more story-driven than photo-driven. If you like learning while you walk, this is a strong moment in the route.
Admission is noted as free for this stop, but remember the tour overall still does not include entry tickets or passes.
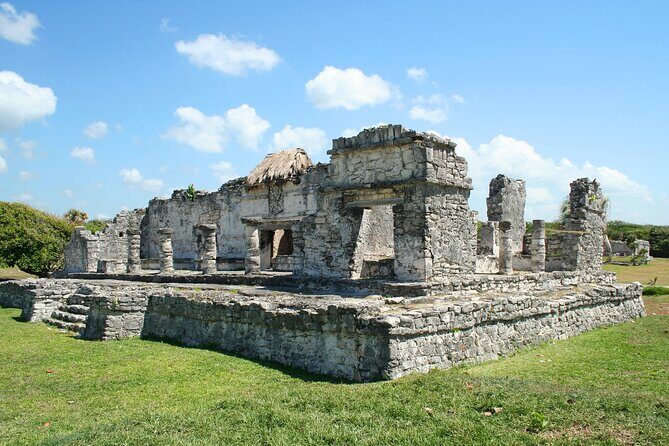
Stop 4: El Castillo (Kukulkan connection and elevation)

You can’t miss El Castillo. The tour notes it’s about 40 feet, built to honor the Mayan God Kukulkan, and positioned at the highest elevation in Tulum to make it even more imposing.
This stop works even if your phone audio is imperfect, because the structure itself is so visually dominant. But the story helps you look past the obvious and understand the meaning the site assigns to the building.
If you’re someone who hates generic commentary, you might like this stop’s focus. It’s not just size and stairs. It’s a named connection to Kukulkan plus a clear reason why the location makes it feel bigger.
Admission is listed as not included for this stop, so plan your entry separately.
Stop 5: Temple of the Frescoes
Now you’re at the Temple of the Frescoes, known in the tour for its detailed paintings of Mayan deities. This is where an audio tour can do something walking alone often can’t: it tells you what to look for.
Even if the frescos aren’t perfectly clear to your eyes from where you stand, you’ll have the story context in your head. That makes the view feel less like guessing.
Like other stops, your experience depends on correct location triggers. If you pause and wander for long stretches, expect the app to miss the timing and let you catch up via the list.
Stop 6: Temple of the Wind (storms warning and round platforms)
The tour then brings you to the Temple of the Wind, described as sitting atop a cliff and built as a warning of approaching storms. It also notes round platforms here, suggesting it functioned as a temple to the Wind God.
This is another stop where the story changes your body language. You tend to look upward and outward more, because the narration frames the location as protective and practical.
Admission is again listed as not included at this stop. If you’re budgeting your day, treat every “not included” stop as a sign you need to have site entry handled already.
Stop 7: Casa del Chultún (rainwater harvesting)
Next up is Casa del Chultún, and the story focus is Mayan engineering. Here, rainwater harvesting is highlighted as how people in Tulum kept fresh water available. The building is described as shaped so rainwater drains into a reservoir.
This is one of those sections that makes you feel like you’re learning something real, not just reading trivia. The “how it works” angle gives you a better mental model for why the architecture looks the way it does.
Admission is marked as free for this stop. Still, the audio tour itself doesn’t include tickets.
Stop 8: Templo del Dios del Viento (whistling holes)
From water collection, the tour pivots to sound. Templo del Dios del Viento is explained through a set of holes in the temple. When hurricane-force winds blow from the Caribbean, the holes start to whistle loudly and act as an efficient warning system.
Even if you never experience hurricane-force winds in your lifetime (I’m hoping you don’t), the story gives a reason to look closely at the structure’s details.
This is also a stop where short pauses help. If you spend 20 seconds standing still and really scanning, the story lands better than if you keep moving like you’re late to something.
Admission is listed as free here too.
Stop 9: Great Platform and Casa del Noreste
Next you move past the platform and stop in front of ruins of a house on the right, identified as Casa del Noreste, or the Northwest House. The tour’s framing is that this home belonged to important members of Mayan society.
This isn’t the biggest photo spot, but it can be the most meaningful if you like social context. You’re not just learning about gods and buildings. You’re learning about people and roles.
Admission is noted as free for this stop. That’s a nice bonus if your goal is to stretch value across the day.
Stop 10: Templo Maya (Tulum Playa) and the Descending God
The final stop is Templo Maya (Tulum Playa). The story points to niched figurines of the Maya Descending God, connected to Venus, visible across the main facade. It also mentions a stucco figure on the western wall tied to the temple’s name as the “Temple of the Descending God.”
If you’re the kind of traveler who likes endings that feel like a theme shift, this is a good closer. The earlier stops focused more on practical architecture and structures. This one leans into symbolism and artistry.
Admission is listed as free for this stop in the itinerary notes. After this, the tour ends back at the meeting point.
What support and troubleshooting look like in real life
The tour includes email, chat, and call support, which matters more than it sounds. GPS audio systems are picky, and most problems are fixable without drama.
Two common issues you can avoid:
- Location permissions: If your phone won’t share location, autoplay can fail. Turn on location for the app.
- Wrong spot: If you’re between triggers, audio may not start automatically. Stay close to the walking route and cues.
If an audio segment doesn’t play, you can manually select it from the list. That’s a simple fallback if you’re standing slightly off the GPS path.
And one practical device tip: the tour is recommended for iPhones running iOS 15 or later, Android devices running version 9 or later, and iPads/tablets with GPS and cellular connectivity.
Price and value: $9.99 that compares well to a guided day
For $9.99 per person, this tour is a budget-friendly way to add meaning to your Tulum walk. The best value is the lifetime access, since you can reuse it on later trips or at another time in the future.
But you should also know what you are not buying. The tour does not include admission tickets, attraction passes, or reservations. Some stops are marked as free (like Plataforma Funeraria, Casa del Chultún, and a few others), but you still need to handle general entry requirements separately.
So the cost makes sense if:
- you like self-paced walking,
- you have an interest in story-based learning,
- and you want to control timing around crowds and heat.
If you want a live person to answer questions on the spot and help with navigation and ticketing, a guided option may feel easier, especially if the audio technology doesn’t cooperate with your phone.
Heat, timing, and how to make the audio tour feel effortless
Tulum can feel punishing when you move too fast. I’d plan your walk with breathing room because the tour is designed for breaks and photos.
Bring water, and consider going earlier in the opening hours if your body runs hot. The listed hours run from 8:00 AM to 6:00 PM, seven days a week, through the date range shown.
Also, use the phone wisely. GPS drains battery, especially with frequent screen activity. Download on strong signal first, then keep your phone setup stable for the walk. A power bank can save your day.
If you want the smoothest autoplay, use headphones and keep the phone at a consistent place in your bag or in hand (depending on what helps your GPS lock best).
Should you book this Tulum Mayan Ruins GPS walking audio tour?
Yes, I’d book it if you want an affordable, independent way to learn while walking around 1–2 hours through the site. The GPS hands-free audio, offline maps, and lifetime access make the price feel fair, especially if you like story-driven sightseeing.
I wouldn’t book it as confidently if you:
- hate phone-based navigation,
- don’t want to deal with app setup and permissions,
- or need guaranteed autoplay with zero troubleshooting.
The best way to make this tour work is simple: download on Wi‑Fi, enable location, use headphones, and don’t panic if one story needs manual selection.
If you’re comfortable with that, this is a smart way to get context for Tulum’s ruins without paying for a full guided package.
FAQ
Does this tour include admission tickets or entry fees?
No. The tour does not include attraction passes, entry tickets, or reservations.
How long is the Tulum audio walk?
It’s listed as about 1 hour, but the route is over 1.5 miles and typically takes about 1–2 hours depending on your pace and breaks.
Will it work offline without cellular or Wi‑Fi?
Yes. You’ll need to download the tour while you have strong Wi‑Fi or cellular, but it’s designed to work offline after the download.
How does the audio know when to play?
It uses GPS and location-based triggers, with audio stories that can start automatically as you reach each story point. If playback doesn’t start, you can select the story manually from the app.
Where do I start, and does it end back at the same place?
You start at Ruinas de Tulum in Zona Hotelera Tulum (77765 Q.R., Mexico), and the activity ends back at the same meeting point.
What devices are recommended to run the GPS navigation?
The tour recommends an iPhone with iOS 15 or later, an Android device running version 9 or later, or an iPad/tablet with GPS and cellular connectivity.


More Tours in Tulum


More Tour Reviews in Tulum
- Selva Maya Eco Adventure Park: Ziplining, Hanging Bridges, Rappelling and Cenote
★ 5.0 · 1,057 reviews